
仅为个人学习见解,望大佬不喜勿喷,如有错误,还希望大佬们在评论下方指正
1、关于色彩的一些概念
这里就不探究很深的的理论知识了,毕竟是数学考试考过个位数的人。
Ⅰ、一些常见的颜色模型
- RGB模型:RGB模型也称为加色模型我们在计算机上看到的颜色其实是由三个颜色通道组成的,即RGB三原色通道(其实是RGBA,红绿蓝+透明度);我们可以打开PS,调出RGB颜色面板,将RGB三个通道的值拉为0,最后呈现的颜色即为黑色,将三个值拉满,呈现的就是白色;RGB一般为电子设备上的色彩。
- CMY模型:CMY模型也称为减色模型此外你也可以试试任意两两组合,将任意两颜色拉满另一个颜色为0,会对应出现青色、品色、黄色三种颜色,这就是所谓的CMYK四原色(K是指Black黑色);CMYK一般为打印所选的印刷色

HSB/HSV和HSL颜色模型:三种颜色模式的H都是指色相(Hue),S指饱和度(Saturation),而 B/V/L 都指亮度或明度,对应的英文单词分别为 Brightness/Value/Lightness。
以下的解释参考知乎文章。
先总结一下,HSB 和 HSV 是同一个东西,只是叫法不同而已,所以下面提到 HSB 的时候也代表了 HSV 。
HSB 和 HSL 的区别,我们分开来看:
- HSB 中的 S 控制纯色中混入白色的量,值越大,白色越少,颜色越纯;
- HSB 中的 B 控制纯色中混入黑色的量,值越大,黑色越少,明度越高;
- HSL 中的 S 和黑白没有关系,饱和度不控制颜色中混入黑白的多少;
- HSL 中的 L 控制纯色中的混入的黑白两种颜色。
下面是 Photoshop 和 Affinity Designer 的拾色器:
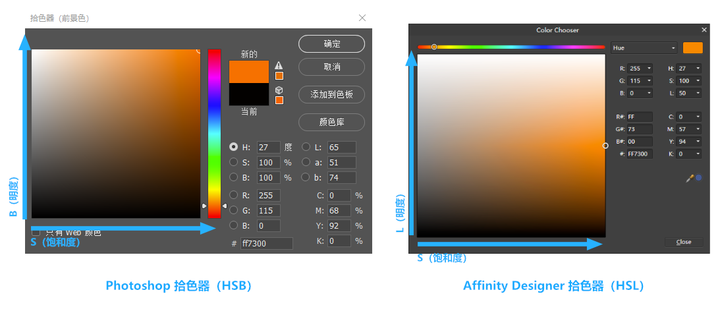
在Photoshop拾色器(HSB)中:左右控制饱和度,最左边是白色,越靠右混入的白色越少颜色越来越纯;上下控制明度,最下面是黑色,越靠上混入的黑色越少颜色越来越亮。
在Affinity Designer拾色器(HSL)中:左右仅仅代表的是饱和度,与黑白没有关系;上下代表的明度,中间为颜色亮度正常,越往下混入的黑色越多颜色越暗,越往上混入的白色越多颜色越亮。
Ⅱ、色轮
色轮可以分为科学色轮和艺术色轮。比如 Photoshop 中用的就是科学色轮,当你选用一个红色【rgb(255,0,0)】,然后反相之后,它会变成青色【rgb(0,255,255)】。
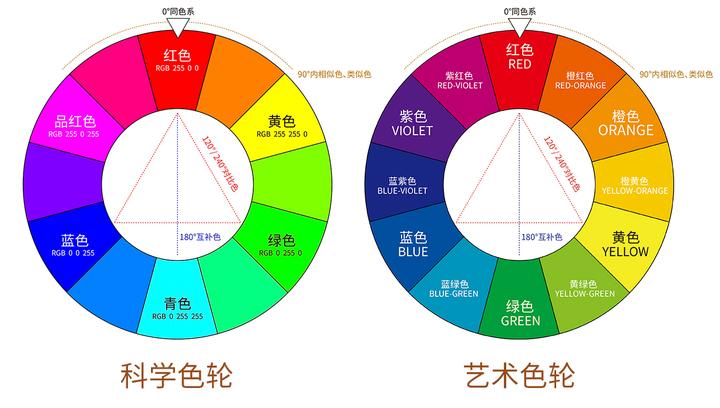
不管是科学色轮还是艺术色轮,大概 30° 可以算作一个颜色;左右相邻的 30° ,即 90° 以内算作是相邻色;相差 180° 的为互补色。
比如在科学色轮中:红色的互补色是青色,红色的相邻色是橙色和粉色
在调色的时候,我们要增加一种颜色,一共有两种方式:一是增加他的相邻色,二是减少他的互补色。
2、关于图层混合模式
说了半天,终于到了图层混合模式了。在Ps、Pr、SAI等众多软件中,常见一种图层混合模式的功能,先让我们看看图层混合模式的计算公式:

看不懂吧!我也看不懂,没事,让我们慢慢来看。【大家不想看我bb的话,也可以看这个大佬的视频,标红的公式是下面重点要说的公式】
Ⅰ、255的来源
图中不难看出,大部分公式下面都有 255,那么这个 255 是怎么来的呢?
我们知道 28 = 256,加上 0 之后就是 [0,255],这也就是 8 bit 的取值范围,所以说一下所有的内容都是基于8位通道的RGB值。

我们如果将 [0,255] 这个取值范围除以 255 ,结果就变成了 [0,1] ,所以你知道255是怎么来的了吧!
我们知道在 Photoshop 的拾色器中,RGB的三个通道值取值范围是 [0,255],而除以 255 的操作正是将这个取值范围换算成 [0,1],这么做的目的是简化公式,更好的理解。
Ⅱ、正片叠底
我们设图层一为 A,图层二为 B,正片叠底之后的图层为 C ,结果如图(颜色是我瞎选的)
我们只看绿色通道(绝对不是我喜欢绿色),图层A 的 G 值为 97,97/255 ≈ 0.38;图层B 的 G 值为207,207/255 ≈ 0.81;然后我们将 0.38 与 0.81 相乘,结果约为 0.31。见证奇迹的时刻来了,我们将 0.31 乘上 255 ,结果为79.05!这个值正好是 图层C 的 G 值。
其它的颜色通道同理,这里就不展开计算了,此时再回看正片叠底的公式,就能很好的理解了。
【这里单从公式来看我觉得不换算到 [0,1] 区间反而更好理解:直接看正片叠底的公式为 A*B / 255 ,假如还是上面的例子,97*207 / 255,其结果依然约等于79】
所以我们得出一个结论就是图层混合模式计算规则是逐像素分通道计算,所谓逐像素就是逐个像素计算。
此外,黑色的 RGB 各通道值都为 0 ,0 乘以任何数值都为 0,所以当黑色与任何颜色正片叠底时,结果都为黑色;白色的RGB各通道值都为 1,1 乘以任何数值都为 1,所以白色与任何颜色正片叠底时,结果都为原来的颜色。
Ⅱ、滤色
滤色公式中出现了反相,所谓反相就是 255 - A,或者说是 1-A
在了解上边正片叠底的例子后,如果我们要将滤色的公式中的 A、B、C 的取值范围从 [0,255] 全部转化为 [0,1],就得将这个公式左右两面均除以 255 ,这个公式就简化成了 C = 1 - (1-A) * (1-B) 。同理正片叠底的公式也能简化成 C = A * B 。
如果我们将 C = 1 - (1-A) * (1-B) 变成 1 - C = (1-A) * (1-B) 你会发现 A与B滤色 的结果正好是 反相A 和 反相B 正片叠底 后再 反相(不信的话,你可以去PS里面试一下(。・∀・)ノ)
再让我们回到公式C = 1 - (1-A) * (1-B),单从数学角度分析,如果 A 的值为 0(即黑色),那么 C = B,所以黑色与任何图层滤色的结果均为原来的颜色,同理白色与任何图层滤色的结果均为白色
如果 A 和 B 的值不全是 1 (即 A 和 B 不都是白色),A 和 B 滤色的结果 C 永远不可能为 1 ,也就是说两个不都是白色的图层滤色,结果永远接近白色但永远不可能为白色
Ⅲ、叠加
从公式中我们可以发现叠加的函数是一个分段函数,并且判断点是 125 的点,125 在 [0,1] 区间内就是中度灰。
我们将叠加函数的公式简化,可以得到
我们再将这个公式与正片叠底和滤色的公式对比,发现相比于原来的两个公式,多了一个系数 2 ,加上这个2的目的是为了让原来正片叠底和滤色的两段函数图像能够在 中度灰 的地方连接起来,最终形成叠加的分段函数
下面我们来用大白话说一下这个公式。当图层的灰度 < 中度灰时,C 的结果就是 A 和 B 两倍正片叠底的结果,灰度越低结果越亮;当图层的灰度 >= 中度灰时,C 的结果就是 A 和 B 两倍滤色的结果,灰度越大结果越暗
【叠加组可以说控制图层是在下面,而原图是处于叠加模式的,具体还是请看这个视频的第二P,大佬讲的很清楚,我自己试了下,不光是叠加,包括正片叠底和滤色控制层应该都放在下面,但具体情况还得具体分析】
Ⅳ、总结
当我们打开PS图层混合模式的时候会发现PS自动帮我们分类出了好几个组,如图:

我们以上说的基本上就对应着 2、3、4 组,第 2 组基本上就是越叠越暗,第 3 组就是越叠越亮,而第 4 组通过中灰为界限来判定亮还是暗,也有UP主做过总结:https://www.bilibili.com/video/BV1B7411F7vm,讲的特别详细,包括 1、5、6 组都有介绍,比我自己总结的好多了!
3、写在最后
我只是将大佬的研究用我自己的理解文字又说了一边而已,难免会有不对的地方,还请指正,了解一点原理会让我们使用起来更加得心应手,也会让我们记忆更加深刻,具体的应用场景还需要我们去不断积累经验。
还有一些题外话。
真的当自己知识到达某一水平之后,发现自己是真的渺小,还有好多奇妙和神奇的东西值得我们去探索和发现,只不过在到达这个知识水平之前可能被很多东西迷的止步不前。感谢我身边的很多朋友能够让我接触到更好更远的世界(当然这个世界指抽象的)当你见识过更好的东西后便有了继续向前的动力。
版权声明: 本作品采用 知识共享署名-非商业性使用-相同方式共享 4.0 国际许可协议 进行许可。转载请注明出处!